Showing posts with label Guest Post. Show all posts

Monday, April 8, 2013

Remodeling for Resale - Meg Fullington


As a full-time REALTOR® people approach me frequently with home selling questions.  Selling your home for the maximum amount possible requires preparation. You want to make sure any renovations you do give you maximum return on investment or (ROI). I’m constantly doing research to see what things can add the most value to a home without costing sellers a fortune. Some simple strategic changes can really help make a home stand out to buyers.  

Kitchens and baths are two of the biggest attractions to home buyers. More often than not it’s these rooms that play a pivotal role in the final buying decision.  Here are some tips to make these spaces shine and help seal the deal without breaking your wallet.

Kitchens:

via smarthomekitchen.com

As stated above, buyers love a great kitchen. Make sure that when deciding on changes to ask a real estate professional for their opinion. Keep it simple and don’t price your home out of your neighborhoods market. When budgeting, aim for a range of 6%-10% of the value of your home to get the most for your money.
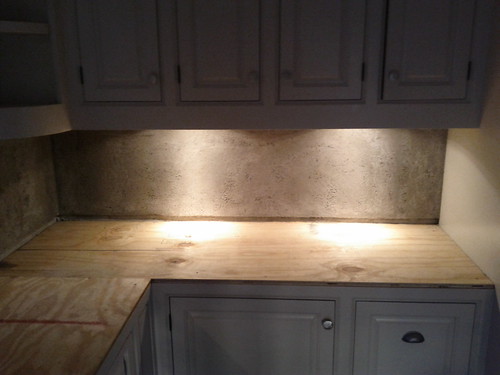
Lighting is a great way to add some punch to your kitchen. Changing some fixtures, adding under counter lighting can transform the entire space. Use neutral and natural colors and steer clear of over the top personalization. There are a variety of great looking counter tops that can update a kitchen without costing a fortune.  Clutter free and clean is what buyers are seeking so when in doubt, throw it out. The cheapest renovation to a kitchen is getting rid of counter clutter. Other items that can add some value are putting in special extras such as a warming drawer or soft closing drawers.

Baths:

via arkshowers.com

Nothing can date a home more quickly than a bathroom. However, it doesn’t mean that you have to completely re-do each one. Some simple fixes can do the trick. Again, changing out light fixtures and hardware can have a huge impact. Keep the color palette natural and steer clear of crazy shower curtains. One great feature that people love is a frame less shower door. These can really rejuvenate the look of a bathroom and come in a variety of prices. A nice updated shower head can also do wonders for the bath. You’ll want to check with experts who deal with renovations in baths to give you some ideas. Folks like Nick Lovelady at Cupboards can certainly give you some useful help in planning/pricing priority items of need for your bathroom renovation and then completing the task.

The final takeaway from this is keep it simple, stay true to your home’s aesthetic and only make changes that will add a lot of bang without pricing your home out of the market!

_______________________________________________

Really excited to have Meg Fullington drop in on the blog today. Hopefully we'll see her around these parts more often. If you're in the market for a new property or just trying to sell the one you have in the Auburn, Opelika or Lake Martin area, Meg is the lady for you! Make sure to check out her blog Auburn - Lake Martin Homes!

Tuesday, February 19, 2013

Bright Ideas for Under-Cabinet Lighting

Thanks to Jay Harris from Home Depot for sharing some awesome ideas on under-cabinet lighting... Good stuff!

light!

Trying to lighten up in the kitchen? Want more radiance in the bathroom? Under-cabinet and below-shelf lighting may be just the illumination you seek. Convenient, sleek, and often camouflaged, such focused task lights offer just a bit of brilliance where needed. Here are a few of the brightest DIY options, as well as details on installing each.

Rope Lighting
Often available in kits, rope lighting comes in a variety of colors and can also be hidden with paintable cord covers. The flexible LED tube offers a low-cost light source along an entire cabinet, shelf, or railing and plugs into an ordinary wall outlet.


  • Use a pencil to draw the exact route you're planning for your rope lighting.
  • Drill any holes needed (for instance, if you're threading the light from the interior of one cabinet to the next) using a drill bit that is slightly larger than the thickness of your light.
  • Measure how long your rope light will need to be, then cut it, keeping in mind that the light may only be safely cut in specific areas (often at 18-inch intervals; consult the manufacturer's instructions to be sure).
  • Thread your light through the holes and attach cable clips for support where necessary.
  • Place the plastic cap from the kit on the end farthest from the power source.
  • On the other end, insert the male electrode into the rope light conductors. Attach and tighten the provided collar and sleeve, then fit the female connector (attached to the power cord) to the male electrode spikes. Screw on the support connector to ensure the male and female connectors remain together.
  • Then simply plug in the power cord. Use a switch-operated outlet to eliminate the need to plug and unplug the light.
  • Fluorescent Lighting Fluorescent lighting comes in lots of shapes and sizes that are easy to install. Though the bulbs may distort colors slightly, they are energy efficient and long lasting. Depending on the model you buy, this thin-profile light source can be wired into place or plugged into a regular socket. Unless you feel comfortable with electrical work, I recommend the latter.
  • Remove the diffuser and bulb from the fixture to gain access to the screw holes.
  • Holding the fixture up to the underside of the cabinet where you would like it to be placed, use a pencil to mark the drill holes. (Bring the fixture as far forward as possible, at least two inches from the wall. You also want to situate it close enough to an outlet for the plug to reach.)
  • Using your marks as a guide, drill pilot holes into the bottom of the cabinet.
  • Attach the fixture using the screws provided. (Before screwing it in, be sure the supplied screws aren't longer than the shelf is thick -- if so, they will poke up through the bottom of the cabinet and you will need shorter screws.)
  • To control the cord placement, strategically place cord clips along the underside of the cabinet and the wall, or install lengths of self-adhesive conduit to conceal the cord.
  • Reinstall the bulb and diffuser and then plug in your light. Just as with the rope lighting, a switch-operated outlet eliminates the need to plug and unplug the light.
  • Puck Lighting Inexpensive puck lights provide perfect color accuracy and are relatively easy to install, gaining power via an outlet or a hard-wired transformer. While halogen lights are safe under cabinets, they're too hot to be mounted inside a cabinet or near plastic or paper goods. For a cooler option, choose xenon bulbs.
  • Lay the pucks, in the arrangement you would like them to appear, directly below the cabinet/shelf to which you will be mounting them. (Hint: Measure the distance from the bottom of the cabinet to the countertop -- this is how far your lights should be mounted from one another.) Be sure to allow room for the cord of the final puck to reach an outlet.
  • Remove the trim ring and lens from each puck, then use the puck or a template (if provided) to mark drill holes on the underside of the cabinet.
  • Drill pilot holes slightly smaller than the supplied screws. (Just as with the fluorescent light installation, be sure the screws aren't too long.)
  • Attach the lights to the cabinet.
  • Wire the puck series together using the plug-in cables provided in the kit, and then secure the wires behind or underneath the cabinet and down the wall using wiring clips.
  • Power the lights by plugging the last puck into an outlet or connecting it to a transformer (if you have the know-how).
  • Do these ideas set off any light bulbs for brightening up your own spaces? If you have installed your own lighting before, do you have any tips for first-timers that I might not have covered above? Jay Harris is a Home Depot sales associate and contributes regularly to Home Depot's blog. His electrical interests in the home include home security systems and home automation.

    Friday, July 13, 2012

    I've Been Famous Lately

    It's been a good few weeks for "Nick publicity" and it's only fair for me to brag and show off thank those who were nice enough to feature/quote/picture me in their blogs and publications.


    Hopefully you'll go to these links and read and comment and tell them how awesome they are to put someone as cool as me in their work.

    K+BB - Web Savvy: Nick Lovelady

    Editor Alice Liao approached me about doing a little impromptu interview for the Web Savvy column in each issue of K+BB. I was flattered and excited, especially after seeing other familiar faces featured in the magazine...

    I'm just glad someone thinks I can be web savvy without being on Facebook!

    Gold Notes - Four Favorite Products I Can't Specify Down South

    Jamie Goldberg has an awesome blog, Gold Notes, that turned four this month. As a celebration, Jamie featured guests on her blog with four as the theme. Jamie and I talked about things we couldn't have in the Deep South during our trip to the BSH Design Center in Irvine, California last month. I couldn't have been more excited to be a part of the birthday celebration for Gold Notes!

    Daily 5 Remodel - It Happened on Facebook (Part 1)

    Leah Thayer at d5R shares the best information for the remodeling industry and thankfully she is pushing old school folks in to the new times. Highlighting successes in social media and other unique marketing endeavors is one of the prime functions of d5R and I was happy to share a small success in social media. Again, customers are out there... We just have to go find them!

    So there you have it... Kind of exciting, eh?

    If you don't regularly read any of these sites, go ahead and book mark them now. Each is fantastic and deserves your eyeballs. You can thank me later.

    Thanks again to Alice, Jamie and Leah for sharing me with their audience. I can't wait for the opportunity to repay them (probably with hugs and such).

    Monday, December 5, 2011

    4 Tips for Winter-Proofing Your Outdoor Kitchen

    Real winter weather is just around the corner in our neck of the woods(some of you are already seeing snow!) and part of every outdoor chef's late season preparation should be winterizing the outdoor version of their kitchen. Whether you have a standalone grill or a full-blown outdoor kitchen, these tips are sure to help keep your space in tip top shape.

    Big thanks to Marisa Alan from Outdoor Living for contributing to Cupboards Blog!


    4 Tips for Winter-Proofing Your Outdoor Kitchen

    Winter’s fast approaching, and that means cold temperatures and precipitation are on the way. If you’ve spent a lot of time working on your outdoor kitchen, this can make for a disaster if you don’t plan properly. But it’s actually pretty easy to get your kitchen ready for cool weather. Here are the 4 tips you need to know for winterizing your outdoor kitchen.

    Shut Water Off

    First and foremost, shut all water off. This includes all lines going to sinks, ice makers, and any other hoses or faucets. Don’t wait until the night of your first freeze to do this. You want to get it shut off well in advance so any water still in the pipes can dry up. If not, you could end up with a pipe bursting and some major repair bills on your hands! Extra tip: remember to insulate all faucets attached to the outside of your home when freezing temperatures get close.

    Unplug

    If you know you won’t be using anything in your outdoor kitchen all season long, go ahead and take the time to unplug any electrical items. Even though you may not be using them, they still use a tiny bit of electricity just being plugged in, so this will help you use less energy and save money on your electric bill. This can be tackled while doing part of the next thing on our list…

    Clean Up

    Since you’re getting everything moved around, put away, and ready to be stored for a few months, it’s a good idea to go ahead and give it a cleaning too. Use a stainless steel cleaning fluid on all stainless surfaces (a bit of polish is a good idea as well) and remember to scrub down all cooking grates and remove any debris that’s fallen back in your grill. This is also a good time to check for things like leaves and small twigs that can get stuck behind refrigerators and other large accessories.

    Use Covers

      Finally, when you’re ready to put everything under wraps until next spring, use some covers to do it. Things like your grill, sink, and pizza oven can all benefit from them, as they’ll prevent snow and ice buildup, keep pesky critters from invading, and stave off any lawn debris that might blow through. Make sure to look for covers made of high quality synthetic material designed for outdoor exposure that can take moisture and sunlight without breaking down, as they’ll do the best at keeping your items protected.

    An outdoor kitchen is one of the best investments you can make in your home, and it’s important to make sure it stays protected during winter. Take care of these 4 areas and your kitchen will look great for years to come!

    _________________________________________________-

    About The Author – Marissa Alan is a writer with Outdoor Living and loves talking seasonal design and decorating. For more on items like chimineas, outdoor grills, patio furniture, and patio heaters, visit OutdoorLiving.com.

    Tuesday, August 23, 2011

    Guest Post: 8 Tips to Create Your Charming Cozy Space

    Big thanks to the kind folks at HomeInteriorsZone.com for taking over the blog today... Get ready for some great tips!

    _____________________________________

    What does cozy mean? Most probably it means something else for every person, but in order for a room to become cozy it should be comfortable, warm and inviting. There are many ways to achieve this, for example through the kind of furniture that you choose, the colors that you opt for and so on.


    1. Vintage air

    In case you are dealing with a vintage style room, you could be thinking about a white sofa and neutral walls. The right atmosphere could be added through the mid century-style art, furnishing and fabrics.

    2. Marine motifs

    Each room should have a certain kind of personality and this is why the majority of people tend to choose a theme. A really popular one is the sea theme. To achieve a cozy room of this kind consider the floor-to-ceiling shelves. Look for the nautical theme items that come in emerald hues because these spice up the antique-finished pottery and basins.

    3. Wooden touch and natural tones

    In case your purpose is to relax in the room, think about the natural tones and a muted color palette. If you happen to have a really nice sight, these colors will allow it to become the center stage of the room, not competing with it. The sight of wood always adds a warm touch to a room, so you should leave the wooden ceiling visible.

    4. Western air meets country feeling

    Do you want to feel the western vibe? There are some details that you have to be careful about. You could add some items, such as a metal washbasin and a straw hat. These add the country feeling even to the most modern rooms. To make the room inviting, you could use some out of the ordinary elements, like hanging lights and as a decoration you could be using a collection of postcards.

    5. Literary hideaway

    Do you want to make sure that the people living in the house will enjoy reading? Add a cushy sectional and a lot of pillows. The books could be stored in low, built-in shelves. To make the room warmer, you could add some other items that are suitable for the style, like a collection of globes and maps that charm the readers. In this case the best colors to opt for are the bright ones.

    6. Monochromatic touch


    Going for something bold? Think about monochromatic designs. The best idea is to keep the walls white and the color should be implemented through the furniture, accessories and lighting. Naturally you will need a focal point that adds some other color to the room, and that grabs the attention of people.

    7. Warm color notes

    It is said that the warmest colors are brown and orange. This is why it might be suitable to opt for a sofa in sandy colors, add some orange end tables and other accessories and don’t forget about using wood either to make sure that you will feel comfortable at the end of a long day.

    8. Natural inspiration

    Another color that you shouldn’t forget about is green. This reminds us of nature and it works very well when combined with brown colors and wood. You could opt for a brick colored couch and add green rugs and accessories in the room.

    ___________________________________________________

    Author Bio:
    This is a guest post by HomeInteriorsZone.com. The blog helps its readers give their home a beautiful look through some real useful articles on home interiors.
    Related Posts Plugin for WordPress, Blogger...